- Support
- How to Set Up a VPN on Windows
- windows 8+ (8, 8.1, 10 and higher)…
windows 8+ (8, 8.1, 10 and higher) manual pptp setup
Setting up PPTP manually with Windows®
1. Click on Windows® flag “start” button
2. Click on settings
3. Click on Network & Internet
4. Click on VPN from left menu
5. Click Add a VPN connection
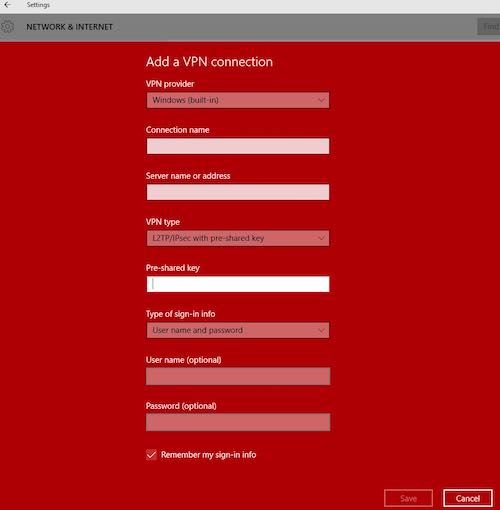
6. Fill the fields with the following
- VPN Provider: Windows (built-in)
- Connection Name: You can name it anything you want “Super Secure PPTP VPN” for example
- Server Address:
PPTP Server Address Locations
USA pptp VPN Gateways
pptp.ashburn.witopia.net
pptp.atlanta.witopia.net
pptp.baltimore.witopia.net
pptp.boston.witopia.net
pptp.chicago.witopia.net
pptp.dallas.witopia.net
pptp.kansascity.witopia.net
pptp.lasvegas.witopia.net
pptp.losangeles.witopia.net
pptp.miami.witopia.net
pptp.newark.witopia.net
pptp.newyork.witopia.net
pptp.portland.witopia.net
pptp.phoenix.witopia.net
pptp.redding.witopia.net
pptp.sanfrancisco.witopia.net
pptp.seattle.witopia.net
pptp.washingtondc.witopia.netCanada pptp VPN Gateways
pptp.montreal.witopia.net
pptp.toronto.witopia.net
pptp.vancouver.witopia.netCentral/South America pptp VPN Gateways
pptp.mexicocity.witopia.net
pptp.saopaulo.witopia.netEurope pptp VPN Gateways
pptp.amsterdam.witopia.net
pptp.barcelona.witopia.net
pptp.berlin.witopia.net
pptp.brussels.witopia.net
pptp.bucharest.witopia.net
pptp.budapest.witopia.net
pptp.copenhagen.witopia.net
pptp.dublin.witopia.net
pptp.frankfurt.witopia.net
pptp.helsinki.witopia.net
pptp.istanbul.witopia.net
pptp.kiev.witopia.net
pptp.lisbon.witopia.net
pptp.london.witopia.net
pptp.luxembourg.witopia.net
pptp.madrid.witopia.net
pptp.mumbai.witopia.net
pptp.oslo.witopia.net
pptp.manchester.witopia.net
pptp.milan.witopia.net
pptp.moscow.witopia.net
pptp.paris.witopia.net
pptp.prague.witopia.net
pptp.riga.witopia.net
pptp.stockholm.witopia.net
pptp.valencia.witopia.net
pptp.vilnius.witopia.net
pptp.warsaw.witopia.net
pptp.zurich.witopia.netAfrica/Middle East pptp VPN Gateways
pptp.jerusalem.witopia.net
pptp.johannesburg.witopia.netAsia pptp VPN Gateways
pptp.bangkok.witopia.net
pptp.hanoi.witopia.net
pptp.hongkong.witopia.net
pptp.kualalumpur.witopia.net
pptp.newdelhi.witopia.net
pptp.singapore.witopia.net
pptp.seoul.witopia.net
pptp.tokyo.witopia.netOceania pptp VPN Gateways
pptp.melbourne.witopia.net
pptp.sydney.witopia.netPowered by HTML5 Responsive FAQ - VPN Type: PPTP
- Type of sign-in info: Username and Password
- Username: Enter your VPN Username*** (will usually be W\YourEmailAddress)
(example: W\johnsmith@gmail.com)
MUST BE A CAPITAL W and a BACKSLASH (NOT FRONTSLASH)
*** Some customers may have a Username in format of “johnsmith@witopia”
You can always check your Username or Reset your VPN Password via your customer portal. - Password: Enter the VPN password you selected when you activated (may be different then the website password)
- Remember my sign-in info: Checked
Your setup will look similar to this

7. Click on Save
Your VPN is setup and ready to be connected
Connecting and disconnecting your VPN
To connect and disconnect your manual vpn connection is simple with a couple of clicks
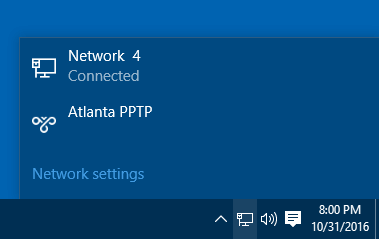
1. Locate the wired or wireless network icon in the bottom left corner of your taskbar.
Windows® may be hiding icons, if so click the arrow to reveal the hidden icons.
2. Click on the network icon to show options
3. Click on VPN profile name

This may bring up the Settings -> Network -> VPN page which is fine
4. Click connect
To disconnect, do the same steps, just click on disconnect
5. Enjoy the vpn
Have more questions? Let us know how we can help you.
